用Pelican 搭建静态blog
之所以选用Pelican而不是WordPress, 是因为前者是用Python写的,而后者则是世界上最好的语言, 目前我对最好的语言还不太感兴趣,所以根据网上教程用Pelican搭建了我的第一个博客。 不过现在本博客是用Flask + Bootstrap + Mysql搭建的, 给了我更多的灵活性, 也更加美观一点
搭建环境
- Ubuntu 14.04 LTS
- Pelican 3.3.0
- Apache 2.4.0
- VPS: digital ocean SFO(非必须,可已选择github page)
- 域名解析:Godaddy
环境配置
安装pelican
pip install pelican
创建blog目录
cd /var/www
mkdir blog
pelican-quickstart
之后终端会问几个问题,一路默认回车就行(有一个要填一下,不过这些都可以在后来生成的pelicanconf.py文件中修改的)
生成的目录结构如下:
1
2
3
4
5
6
7
8
9
blog/
├── content                # 存放输入的markdown或RST源文件
│   └── (pages)            # 存放手工创建的静态页面,可选
│   └── (posts)            # 存放手工创建的文章,可选
├── output                 # 存放最终生成的静态博客
├── develop_server.sh      # 测试服务器
├── Makefile               # 管理博客的Makefile
├── pelicanconf.py         # 配置文件
└── publishconf.py         # 发布文件,可删除
主题和插件
- 克隆主题到本地
git clone https://github.com/getpelican/pelican-themes.git - 安装主题——bootstrap3
cd pelican-themespelican-themes -i pelican-bootstrap3这一步是将主题pelican-bootstrap3安装到Python库里,Ubuntu下路径为/usr/local/lib/python2.7/dist-packages/pelican/themes/,所以后面修改字体和banner时需要在这个文件夹下的pelican-bootstrap3/templates文件修改 - 克隆插件到本地
cd /var/www/bloggit clone git://github.com/getpelican/pelican-plugins.git此处将pelican的插件放在/var/www/blog的文件夹下
配置pelicanconf.py
博客的很多内容都是在/var/www/blog/pelicancof.py文件中配置的
1
2
3
4
5
AUTHOR = u'Friday'
SITENAME = u'\u6211\u7684\u7cbe\u795e\u5bb6\u56ed' #博客名字
SITEURL = 'http://localhost:80'
TIMEZONE = 'Asia/Shanghai' #时区改成上海
THEME = 'pelican-bootstrap3' #主题设置为pelican-bootstrap3
添加社交账号
SOCIAL = ((‘facebook’, ‘https://www.facebook.com/li.dongyong?ref=bookmarks’), (‘twitter’,’https://twitter.com/dongyongli’), (‘github’,’https://github.com/Friday21’),)
DEFAULT_PAGINATION = 5 #每页显示5篇文章
PLUGIN_PATHS = [u’pelican-plugins’,] #插件地址,因为插件放在了和blog同级目录,所以可以 直接用pelican-plugins, #若放在其他地方改成相应路径即可 PLUGINS = [‘sitemap’, ‘related_posts’, ‘random_article’, ‘liquid_tags.img’, ‘liquid_tags.video’, ‘liquid_tags.youtube’, ‘liquid_tags.vimeo’, ‘liquid_tags.include_code’,’tag_cloud’,’tipue_search’]#使用到的插件 RANDOM = ‘random.html’ RELATED_POSTS_MAX = 10 DIRECT_TEMPLATES = (‘index’, ‘categories’, ‘authors’, ‘archives’, ‘tags’,’search’) ARTICLE_URL = ‘blog/{slug}.html’ ARTICLE_SAVE_AS = ‘blog/{slug}.html’ PAGE_URL = ‘{slug}.html’ PAGE_SAVE_AS = ‘{slug}.html’ TAG_URL = ‘tags/{slug}.html’ TAG_SAVE_AS = ‘tags/{slug}.html’ TAGS_URL = ‘tags.html’ DISPLAY_CATEGORIES_ON_MENU = False DISPLAY_CATEGORIES_ON_SIDEBAR = False #不显示categories(感觉有tags就够了) DISPLAY_TAGS_ON_SIDEBAR = True #在边上显示标签栏
1
2
3
4
5
6
7
8
9
10
11
12
## 发布第一篇博客
用markdown写下第一篇文章,开头要包含以下内容:
```python
Title: My super title 必须
Date: 2010-12-03 10:20 必须
Modified: 2010-12-05 19:30
Category: Python
Tags: pelican, publishing
Slug: my-super-post 必须
Authors: Alexis Metaireau, Conan Doyle
Summary: Short version for index and feeds
写好后把md文件放在blog下的content目录中,发布博客
cd /var/www/blog
make publish
如果成功的话可以在blog目录下看到output文件夹,里面就是网站的所有内容,将其部署到github pages上即可以访问,在github创建username.github.io repo,其中username为你github的用户名,然后在Ubuntu上把博客内容推送到github pages上
1
2
3
4
5
6
cd /var/www/blog/output
git init
git add .
git commit -m'first commit'
git remote add origin git@github.com:username/username.github.io.git
git push -u origin master
成功后访问username.github.io即能成功看到你的blog
Apache 配置
如果不想用github page当然也可以用自己的VPS,让blog运行在Apache上
- 安装Apache
sudo apt-get install apache2 - 配置虚拟主机
cd /etc/apache2/sites-available/新建blog的配置文件vim blog.conf添加如下内容 ```python
<Directory /var/www/blog/output> #博客目录 Options Indexes FollowSymLinks AllowOverride None Require all granted </Directory> <VirtualHost *:80> # Admin email, Server Name (domain name) and any aliases ServerAdmin lidongyong22@gmail.com ServerName fridayhaohao.com #服务器名字 ServerAlias www.fridayhaohao.com #域名
1
2
3
# Index file and Document Root (where the public files are located)
DirectoryIndex index.php index.html
DocumentRoot /var/www/blog/output #文件目录
</VirtualHost>
1
使文件生效:
$ sudo a2ensite duncanlock.test $ sudo service apache2 restart
1
2
3
4
5
6
7
8
9
10
11
12
13
14
15
16
17
18
19
20
21
22
23
24
25
26
27
28
29
30
31
32
成功后需要在godaday上将你的域名连接到服务器上的ip, 在DNS ZONE FILE下添加一天A记录,HOST:@,POINTS TO: 你的服务器IP,等待一段时间后就可以通过你的域名来访问你的blog啦!
## 进一步完善博客
### bootstrap主题
bootstrap下还细分有很多主题,免费的可以在[这里](http://bootswatch.com/)看到,我选的是Cerulean, 舒服的蓝色主题,只需要在pelicanconf.py中添加`BOOTSTRAP_THEME = 'cerulean'`, 然后在blog目录下make publish 就会生效了
### banner
根据DandyDev的pelican-bootstrap3的[文档](https://github.com/DandyDev/pelican-bootstrap3)的说明:
>A banner image can be added to the theme, displayed with the SITENAME and an optional subtitle. Config options are as follows:
Set the banner image with BANNER = '/path/to/banner.png'
Set the subtitle text with BANNER_SUBTITLE = 'This is my subtitle'
By default, the banner is only shown on the index page. To display the banner on all pages, set BANNER_ALL_PAGES = True
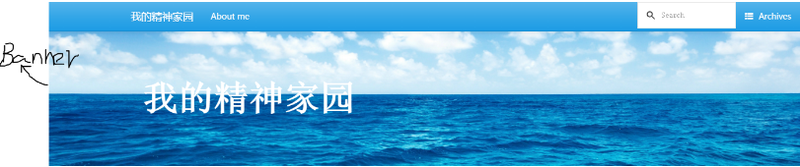
在content目录下新建文件夹`images`, 把要设置的首页头部图片放在此文件夹下,并在pelican.conf中添加 `BANNER = '/images/banner.png'`, banner.png 为图片的文件名,建议选好想要的图片后调整到适合的长宽比,用截图工具就行。我选了一张大海的图片,与上一步选的主题配合的很好。效果如下图:
### 字体
pelican默认英文字体,所以中文显示很难看!按照习惯还是调成微软雅黑舒服一点,办法如下:
尽如Python的pelican库文件夹,编辑style.css文件我的目录是`/usr/local/lib/python2.7/dist-packages/pelican/themes/pelican-bootstrap3/static/css/style.css`
在头部添加以下两段:
```css
h1, h2, h3, h4, h5, h6, .h1, .h2, .h3, .h4, .h5, .h6 {
font-family: "Microsoft YaHei UI", "Microsoft YaHei", "Arial", "Verdana", "Tahoma";
font-weight: 500;
}
body {
font-family: "Microsoft YaHei", "Arial", "Verdana", "Tahoma";
color: #424242;
}
make publish 后就能看到中文显示舒服多了。 其实在这个文件中还可以进一步美化banner,比如把我的精神家园后面的黑框改为透明的,只需要把backgroud中的0.7改为0就行啦
1
2
3
4
5
6
7
8
9
#banner .copy {
    background: none repeat scroll 0 0 rgba(0, 0, 0, 0.7);
    display: inline;
    float: left;
    max-width: 600px;
    padding: 20px;
    position: relative;
    z-index: 1;
}
改完后make publish就能看到效果了,体会下两张图的不同:

下图是设置为0.7的效果,上图是设置成0的透明效果。哈哈虽然前端基础为0,但这个过程中对前端增加了些了解。
添加多说评论
作为blog怎么能少的了评论呢,pelican自带的评论插件是Disqus comments, 但那是针对国外用户的,咱在局域网中上不了Facebook和Twitter,所以还是选择国内有名的评论插件——多说评论。
首先需要在多说的网站上注册,绑定网站信息,获取js代码,并根据提示修改成如下代码:
1
2
3
4
5
6
7
8
9
10
11
12
13
14
15
16
<!-- 多说评论框 start -->
    <div class="ds-thread" data-thread-key="" data-title="" data-url="/"></div>
<!-- 多说评论框 end -->
<!-- 多说公共JS代码 start (一个网页只需插入一次) -->
<script type="text/javascript">
var duoshuoQuery = {short_name:"lyon0804"};
    (function() {
        var ds = document.createElement('script');
        ds.type = 'text/javascript';ds.async = true;
        ds.src = (document.location.protocol == 'https:' ? 'https:' : 'http:') + '//static.duoshuo.com/embed.js';
        ds.charset = 'UTF-8';
        (document.getElementsByTagName('head')[0]
         || document.getElementsByTagName('body')[0]).appendChild(ds);
    })();
    </script>
<!-- 多说公共JS代码 end -->
尽如pelican的Python库,编辑评论模板,
vim /usr/local/lib/python2.7/dist-packages/pelican/themes/pelican-bootstrap3/templates/includes/comments.html
对照着disqus评论添加如下内容:
1
然后在pelicanconf.py中添加DUOSHUO_SITENAME字段,make publish 即可生效,我在多说网站上填的是fridayhaohao,所以我添加了DUOSHUO_SITENAME = 'fridayhaohao'
Google站内搜索
pelican自带的tipue_search用起来bug多多,果断换成高大上的Google站内搜索 ,根据网上的指导自己怎么做都不成功,最终折腾的结果是在pelicanconf中启用tipue_search(因为我懒得去调搜索框的大小),但是把search.html内容换成Google站内搜索的代码,搞定!(pelican-bootstrap3似乎没有bootstrap2的Google搜索内置代码,坑!)
- 启用tipue_search
在PLUGINS中添加tipue_search
在DIRECT_TEMPLATES中添加search
1
2
3
4
5
PLUGINS = ['sitemap', 'related_posts', 'random_article',
         'liquid_tags.img', 'liquid_tags.video',
         'liquid_tags.youtube', 'liquid_tags.vimeo',
         'liquid_tags.include_code','tag_cloud','tipue_search']
DIRECT_TEMPLATES = ('index', 'categories', 'authors', 'archives', 'tags','search')
- 换成Google站内搜索 首先在Google站内搜索申请,得到自己的ID,然后把search.html替换为如下内容: ```html <!DOCTYPE html>
```
make publish 生效,但是局域网内上不了Google,所以搜索功能只能翻墙使用,但对我来说不算问题,blog搜索功能主要还是自己用